C++ デザインパターン#
1 デザインパターンの基礎#
1.1 デザインパターンの基本原則#
最終目的: 高い内聚性、低い結合性
(1)オープン・クローズド原則(OCP, Open For Extension, Closed For Modification)
クラスの変更はコードを修正するのではなく、コードを追加することで行う。
(2)単一責任原則(SRP, Single Responsibility Principle)
クラスの責任は単一であり、外部には一つの機能のみを提供し、クラスの変更の原因は一つだけであるべきである。
(3)依存関係逆転原則(DIP, Dependency Inversion Principle)
抽象(インターフェース)に依存し、具体的な実装(クラス)には依存しない、つまりインターフェースに対してプログラミングを行う。
(4)インターフェース分離原則(ISP, Interface Segregation Principle)
クライアントのプログラムが必要のないインターフェースメソッドに依存することを強制すべきではない。一つのインターフェースは一つの外部機能のみを提供すべきであり、すべての操作を一つのインターフェースにまとめるべきではない。
(5)リスコフの置換原則(LSP, Liskov Substitution Principle)
任意の抽象クラスが出現する場所には、その実装クラスを置き換えることができる。実際には仮想メカニズムであり、言語レベルでオブジェクト指向機能を実現する。
(6)コンポジションを優先し、継承を避ける原則(CAPP, Composite/Aggregate Reuse Principle)
継承を使用すると、親クラスの変更が子クラスの動作に影響を与える可能性がある。
オブジェクトのコンポジションを使用すると、その依存性が低下する。
(7)ディミテルの法則(LOD, Law Of Demeter)
オブジェクトは他のオブジェクトについてできるだけ少ない知識を持つべきであり、これによりオブジェクト間の結合を減らし、システムの保守性を向上させる。例えば、プログラム内の各モジュールが相互に呼び出す際には、通常、統一されたインターフェースを提供して実現する。このようにして、他のモジュールは別のモジュールの内部実装の詳細を知る必要がなく、あるモジュール内の実装が変更されても他のモジュールの使用には影響しない。
2 依存関係逆転とディミテルの法則#
2.1 依存関係逆転(DIP, Dependency Inversion Principle)#
以下のプログラムでは、Computer クラスは具体的なクラスに依存せず、3 つの抽象クラスに依存している。3 つのクラスをオーバーライドすることで、我々が望む機能を実現する。オーバーライドしたサブクラスで Computer を初期化することで、依存性を軽減し、柔軟性を高めている。
図のように:

コードは以下の通り:
// 依存関係逆転原則
// 抽象(インターフェース)に依存し、具体的な実装(クラス)には依存しない、つまりインターフェースに対してプログラミングを行う。

#include <iostream>
using namespace std;

//抽象クラスHardDisk
class HardDisk{
public:
    virtual void work() = 0;
};

//抽象クラスMemory
class Memory{
public:
    virtual void work() = 0;
};

//抽象クラスCpu
class Cpu{
public:
    virtual void work() = 0;
};

//HardDiskを継承し、workをオーバーライド
class JSDhardDisk: public HardDisk{
public:
    void work(){
        cout << "JSDhardDisk is working" << endl;
    }
};

//Memoryを継承し、workをオーバーライド
class XSMemory: public Memory{
public:
    void work(){
        cout << "XSMemory is working" << endl;
    }
};

//Cpuを継承し、workをオーバーライド
class InterCpu: public Cpu{
public:
    void work(){
        cout << "InterCpu is working" << endl;
    }
};

//Computerクラスを定義し、継承ではなくコンポジションを使用
class Computer{
public:
    //コンストラクタ、3つのコンポーネントを初期化
    Computer(HardDisk *hardDisk, Memory *memory, Cpu *cpu){
        this->m_hardDisk = hardDisk;
        this->m_memory = memory;
        this->m_cpu = cpu;
    }
    //実行関数
    void work(){
        m_hardDisk->work();
        m_memory->work();
        m_cpu->work();
    }
private:
    //3つのクラスを定義し、Computer内でコンポジション
    HardDisk *m_hardDisk;
    Memory *m_memory;
    Cpu *m_cpu;
};

//テスト関数
void test01(void){
    //3つの抽象クラスのポインタを定義
    HardDisk *hardDisk = NULL;
    Memory *memory = NULL;
    Cpu *cpu = NULL;

    //そのサブクラスのコンストラクタを使用
    hardDisk = new JSDhardDisk;
    memory = new XSMemory;
    cpu = new InterCpu;

    Computer computer(hardDisk, memory, cpu);
    computer.work();
    delete cpu;
    delete memory;
    delete hardDisk;
}

//メイン関数
int main(void){
    test01();
    system("pause");
    return 0;
}
2.2 ディミテルの法則(LOD, Law Of Demeter)#
方法 1:

コードは以下の通り:
#include <iostream>
using namespace std;

class Stranger{
public:
    void speak(void){
        cout << "I am Stranger" << endl;
    }
};

class Friend{
public:
    void speak(void){
        cout << "I am your friend" << endl;
    }
    Stranger* get_Stranger(){
        return new Stranger();
    }
};

//TomはStrangerに直接アクセスせず、Friendを通じてアクセスする
class Tom{
public:
    void speak(Friend &fri){
        fri.speak();
        Stranger *stranger = fri.get_Stranger();
        stranger->speak();
    }
};

void test01(void){
    Tom tom;
    Stranger stranger;
    Friend fri;
    tom.speak(fri);
}

int main(void){
    test01();
    system("pause");
    return 0;
}
方法 2:

#include <iostream>
using namespace std;

class Stranger{
public:
    void play(void){
        cout << "I am Stranger" << endl;
    }
};

class Friend{
public:
    void play(void){
        cout << "I am your friend" << endl;
    }
    void playWithStranger(void){
        Stranger *stranger = new Stranger;
        stranger->play();
    }
};

class Tom{
public:
    void play(void){
        cout << "I am Tom" << endl;
    }
    void setFriend(Friend *fri){
        this->m_fri = fri;
    }
    void playWithFri(void){
        m_fri->play();
    }
    void playWithStranger(void){
        m_fri->playWithStranger();
    }
private:
    Friend *m_fri;
};

void test01(void){
    Tom tom;
    Friend *fri;
    tom.setFriend(fri);
    tom.playWithStranger();
    delete fri;
}

int main(void){
    test01();
    system("pause");
    return 0;
}
方法 3:

Tom は Stranger の抽象に依存し、具体的な Stranger には依存しない。
#include <iostream>
using namespace std;

class Stranger{
public:
    virtual void play(void) = 0;
};

class StrangerA: public Stranger{
public:
    void play(void){
        cout << "I am StrangerA" << endl;
    }
};

class Friend{
public:
    void play(void){
        cout << "I am your friend" << endl;
    }
};

class Tom{
public:
    void setFriend(Friend *fri){
        this->m_fri = fri;
    }
    void setStranger(Stranger *stranger){
        this->m_stranger = stranger;
    }
    void play(void){
        cout << "I am Tom" << endl;
        m_fri->play();
        m_stranger->play();
    }
private:
    Friend *m_fri;
    Stranger *m_stranger;
};

void test01(void){
    Tom tom;
    Friend *fri = new Friend();
    Stranger *stranger = new StrangerA();

    tom.setFriend(fri);
    tom.setStranger(stranger);
    tom.play();
    delete stranger;
    delete fri;
}

int main(void){
    test01();
    system("pause");
    return 0;
}
3 創造的パターン#
3.1 シングルトンパターン#
3.1.1 ライフサイクルパターンとホットパターン#
シングルトン化は、コンストラクタをプライベートに設定することで、クラス内部でのみインスタンス化できるようにする。クラス内に静的変数を設定し、静的関数を通じて初期化することで、クラスが一つのオブジェクトしかインスタンス化できないことを保証する。
懒汉模式は、グローバルで静的オブジェクトを初期化し、NULL に設定する。静的関数が呼び出されたときにのみ構築されるため、懒汉模式と呼ばれる。
懒汉模式のコードは以下の通り:
#include <iostream>
using namespace std;

class Singleton{
public:
    static Singleton *getInstance(void){
        if(m_singleton == NULL){
            m_singleton = new Singleton();
        }
        return m_singleton;
    }
    static void freeInstance(void){
        if(m_singleton != NULL){
            delete m_singleton;
            m_singleton = NULL;
        }
    }
private:
    static Singleton* m_singleton;
    Singleton(void){
        cout << "The structure of Singleton" << endl;
    }
};

Singleton* Singleton::m_singleton = NULL;

void test01(void){
    Singleton *p1 = Singleton::getInstance();
    Singleton *p2 = Singleton::getInstance();
    if(p1 == p2){
        cout << "p1 = p2" << endl;
    }
    else{
        cout << "p1 != p2" << endl;
    }
}

int main(void){
    test01();
    system("pause");
    return 0;
}
饿汉模式は、グローバルで静的オブジェクトを初期化する。懒汉模式との違いは以下の通り:
  	static Singleton *getInstance(void){
        return m_singleton;
    }

Singleton* Singleton::m_singleton = new Singleton();
3.1.2 ライフサイクルパターンのマルチスレッド#
懒汉模式は、提供されたインターフェースが呼び出されるときにのみ構築され、クラスは一つの関数しか構築できない。マルチスレッド環境では、構築関数の実行時間が長すぎると(単一スレッドに割り当てられたタイムスライスを超える)、タイムスライスが終了した後、後続のスレッドは構築する必要があるオブジェクトが依然として NULL であると判断し、後続のスレッドは同じオブジェクトを並行して構築しようとする。このようにして、単一のオブジェクトが複数回構築され、シングルトンの特性が失われる。
//懒汉模式のマルチスレッド問題
#include <iostream>
using namespace std;
#include <windows.h>
#include <process.h>

class Singleton{
public:
    static Singleton *getInstance(void){
        if(m_singleton == NULL){
            count++;
            m_singleton = new Singleton();
        }
        return m_singleton;
    }
    static void freeInstance(void){
        if(m_singleton != NULL){
            delete m_singleton;
            m_singleton = NULL;
        }
    }
    static void printS(void){
        cout << "Singleton printS test\n";
    }
private:
    static Singleton* m_singleton;
    static int count;
    Singleton(void){
        cout << "The structure of Singleton(begin)\n";
        cout << "The structure of Singleton(end)\n";
        Sleep(1000);
    }
};

Singleton* Singleton::m_singleton = NULL;
int Singleton::count = 0;

void myThreadFunc(void*){
    Singleton::getInstance()->printS();
}

void test01(void){
    HANDLE hThread[10];
    for(int i=0; i<3; i++){
        hThread[i] = (HANDLE)_beginthread(myThreadFunc, 0, NULL);
    }
    for(int i=0; i<3; i++){
        WaitForSingleObject(hThread[i],INFINITE);
    }
    Singleton::freeInstance();
}

int main(void){
    test01();
    system("pause");
    return 0;
}
3.1.3 ライフサイクルパターンのマルチスレッド同期最適化#
懒汉模式は、マルチスレッド環境での最適化を行うために、クリティカルセクションを設定し、二重チェックを実行する。懒汉模式を最適化し、クラスが一つのオブジェクトしかインスタンス化できないことを保証する。これにより、重複構築を避け、シングルトンの特性を満たす。
核心コードは以下の通り:
CRITICAL_SECTION cs;
InitializeCriticalSection(&cs); //クリティカルセクションを初期化

	static Singleton *getInstance(void){
        if(m_singleton == NULL){
            EnterCriticalSection(&cs); //クリティカルセクションに入る
            if(m_singleton == NULL){
                m_singleton = new Singleton();
            }
            LeaveCriticalSection(&cs); //クリティカルセクションから出る
        }
        return m_singleton;
    }
3.2 シンプルファクトリーパターン#
シンプルファクトリーパターンは、標準のデザインパターンではなく、オープン・クローズド原則に従っていないが、シンプルで使いやすい。
ロジックの示意図は以下の通り:

サンプルコードは、ファクトリ内の public メソッドでオブジェクトを構築し、戻り値は抽象クラスのポインタであり、このクラスの多態性を通じて異なるタイプのポインタを返し、ファクトリー生産オブジェクトを実現する。コードは以下の通り:
#include <iostream>
using namespace std;
#include <string.h>

//抽象クラスを定義
class Fruit{
public:
    virtual void getFruit(void) = 0;
};

//抽象クラスを継承し、getFruitをオーバーライド
class Banana: public Fruit{
public:
    void getFruit(void){
        cout << "I am Banana" << endl;
    }
};

//抽象クラスを継承し、getFruitをオーバーライド
class Apple: public Fruit{
public:
    void getFruit(void){
        cout << "I am Apple" << endl;
    }
};

//ファクトリーを定義し、その中の共通関数creatでインスタンスオブジェクトを構築
class Factor{
public:
    Fruit *creat(string p){
        if(p == "Banana"){
            return new Banana;
        }
        else if(p == "Apple"){
            return new Apple;
        }
        else{
            cout << "Not supported" << endl;
            return NULL;
        }
    }
};

//テスト関数
void test01(void){
    Factor *fac = new Factor;
    Fruit *fru = NULL;

    fru = fac->creat("Banana");
    fru->getFruit();
    delete fru;

    fru = fac->creat("Apple");
    fru->getFruit();
    delete fru;

    delete fac;

}

int main(void){
    test01();
    system("pause");
    return 0;
}
3.3 ファクトリーパターン#
この例では、ファクトリーパターンは 2 つの抽象クラスを実装することによって行われ、抽象フルーツクラスと抽象ファクトリークラスである。最初に抽象ファクトリーをインスタンス化し、インスタンス化されたファクトリーを生成し、このファクトリーを通じて指定されたフルーツを生産する。一つのファクトリーが一つのフルーツを生産し、フルーツの生産カテゴリを追加したい場合は、新しいフルーツクラスとそのクラスのファクトリーを追加するだけで、他のコードを修正する必要がなく、オープン・クローズド原則に従い、コードの柔軟な拡張を実現する。
思考図は以下の通り:

サンプルコードは以下の通り:
#include <iostream>
using namespace std;

//抽象クラスFruitを定義
class Fruit{
public:
    virtual void sayName(void) = 0;
};

//Fruitを継承し、sayNameをオーバーライドし、Bananaを定義
class Banana: public Fruit{
public:
    void sayName(void){
        cout << "I am Banana" << endl;
    }
};

//Fruitを継承し、sayNameをオーバーライドし、Appleを定義
class Apple: public Fruit{
public:
    void sayName(void){
        cout << "I am Apple" << endl;
    }
};

//抽象ファクトリーAbFactorを定義
class AbFactor{
public:
    virtual Fruit *creat(void) = 0;
};

//抽象ファクトリーを継承し、creatをオーバーライドし、BananaFactorを定義
class BananaFactor: public AbFactor{
public:
    Fruit *creat(void){
        return new Banana;
    }
};

//抽象ファクトリーを継承し、creatをオーバーライドし、AppleFactorを定義
class AppleFactor: public AbFactor{
public:
    Fruit *creat(void){
        return new Apple;
    }
};

/////////////////////////////////////////////////////////////////
//ファクトリーパターンを使用した後、新しいクラスを追加する際に元のコードを修正する必要がなく、オープン・クローズド原則に従っている
class Pear: public Fruit{
public:
    void sayName(void){
        cout << "I am pear" << endl;
    }
};

class PearFactor: public AbFactor{
    Fruit *creat(void){
        return new Pear;
    }
};

//テスト関数
void test01(void){
    AbFactor *factor = NULL;
    Fruit *fruit = NULL;

    factor = new BananaFactor;
    fruit = factor->creat();
    fruit->sayName();
    delete fruit;
    delete factor;

    factor = new AppleFactor;
    fruit = factor->creat();
    fruit->sayName();
    delete fruit;
    delete factor;

    factor = new PearFactor;
    fruit = factor->creat();
    fruit->sayName();
    delete fruit;
    delete factor;
}

int main(void){
    test01();
    system("pause");
    return 0;
}
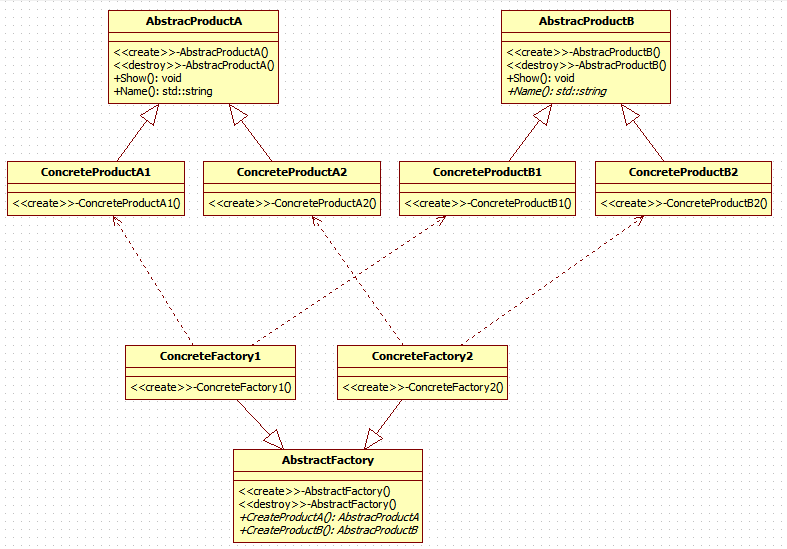
3.4 抽象ファクトリー#
ファクトリーパターンは一つの製品しか生産できない(バナナかリンゴか)が、抽象ファクトリーは一度に一つの製品ファミリー(多くの製品で構成される)を生産できる。ファクトリーパターンと比較して、抽象ファクトリーはより多くの製品を生産できるが、拡張性が低下する。
サンプルコードでは、工場とフルーツを同時に抽象化し、南方工場と北方工場に分け、両方の工場が Apple と Banana を生産する。思考図は以下の通り:
サンプルコードは以下の通り:
#include <iostream>
using namespace std;

//抽象クラスFruitを定義
class Fruit{
public:
    virtual void sayName(void) = 0;
};

//北方のバナナを定義
class NorthBanana: public Fruit{
public:
    void sayName(void){
        cout << "I am Banana, I am from North" << endl;
    }
};

//北方のリンゴを定義
class NorthApple: public Fruit{
public:
    void sayName(void){
        cout << "I am Apple, I am from North" << endl;
    }
};

//南方のバナナを定義
class SouthBanana: public Fruit{
public:
    void sayName(void){
        cout << "I am Banana, I am from south" << endl;
    }
};

//南方のリンゴを定義
class SouthApple: public Fruit{
public:
    void sayName(void){
        cout << "I am Apple, I am from south" << endl;
    }
};

//抽象ファクトリーAbFactoryを定義
class AbFactory{
public:
    virtual Fruit *creatBanana(void) = 0;
    virtual Fruit *creatApple(void) = 0;
};

//北方工場を定義
class NorthFactor: public AbFactory{
public:
    Fruit *creatBanana(void){
        return new NorthBanana;
    }

    Fruit *creatApple(void){
        return new NorthApple;
    }
};

//南方工場を定義
class SouthFactor: public AbFactory{
public:
    Fruit *creatBanana(void){
        return new SouthBanana;
    }

    Fruit *creatApple(void){
        return new SouthApple;
    }
};

//テストプログラム
void test01(void){
    AbFactory *factor = NULL;
    Fruit *fruit = NULL;

    factor = new NorthFactor;

    fruit = factor->creatApple();
    fruit->sayName();
    delete fruit;
    fruit = factor->creatBanana();
    fruit->sayName();
    delete fruit;
    delete factor;

    factor = new SouthFactor();

    fruit = factor->creatApple();
    fruit->sayName();
    delete fruit;
    fruit = factor->creatBanana();
    fruit->sayName();
    delete fruit;
    delete factor;
}

int main(void){
    test01();
    system("pause");
    return 0;
}
3.5 ビルダーパターン#
適用状況:オブジェクトの構築が複雑な場合、オブジェクトの構築と表現を分離する。
ビルダーパターンは、指揮者がビルダーを制御してビルドを行い、ビルドプロセスは指揮者の手にある。ビルダーは構築の具体的な状況を気にせず、必要なオブジェクトを構築することに専念する。
具体的なロジックは、ビルダーを指揮者に渡し、指揮者のプライベートプロパティに設定し、指揮者内部でビルダーのプロパティを呼び出してオブジェクトを構築する。構築後、Builder のプロパティは変更され、getHouse () を通じて m_house を取得し、各種 get メソッドを使用して建物の状況を確認できる。
思考図は以下の通り:

コードは以下の通り:
#include <iostream>
using namespace std;

class House{
public:
    void setDoor(string door){
        this->m_door = door;
    }

    void setWall(string wall){
        this->m_wall = wall;
    }

    void setWindow(string window){
        this->m_window = window;
    }

    string getDoor(void){
        cout << m_door << endl;
        return m_door;
    }

    string getWall(void){
        cout << m_wall << endl;
        return m_wall;
    }

    string getWindow(void){
        cout << m_window << endl;
        return m_window;
    }
private:
    string m_door;
    string m_wall;
    string m_window;
};

//抽象ビルダー
class Builder{
public:
    virtual void buildWall(void) = 0;
    virtual void buildDoor(void) = 0;
    virtual void buildWindow(void) = 0;
    virtual House *getHouse(void) = 0;
};

//具体的なFlatビルダー
class FlatBuilder: public Builder{
public:
    FlatBuilder(void){
        this->m_house = new House;
    }

    void buildWall(void){
        m_house->setWall("Flat wall");
    }

    void buildDoor(void){
        m_house->setDoor("Flat door");
    }

    void buildWindow(void){
        m_house->setWindow("Flat window");
    }

    House *getHouse(void){
        return this->m_house;
    }
private:
    House *m_house;
};

//具体的なVillaビルダー
class VillaBuilder: public Builder{
public:
    VillaBuilder(void){
        this->m_house = new House;
    }

    void buildWall(void){
        m_house->setWall("Villa wall");
    }

    void buildDoor(void){
        m_house->setDoor("Villa door");
    }

    void buildWindow(void){
        m_house->setWindow("Villa window");
    }

    House *getHouse(void){
        return m_house;
    }
private:
    House *m_house;
};

//指揮者(Director)、ビルドロジックを担当
//ビルダーは具体的な作業を行う
class Director{
public:
    Director(Builder *builder){
        this->m_builder = builder;
    }

    void Construct(void){
        m_builder->buildWall();
        m_builder->buildWindow();
        m_builder->buildDoor();
    }
private:
    Builder *m_builder;
};

//テストプログラム
void test01(void){
    House *house = NULL;
    Builder *builder = NULL;
    Director *director = NULL;

    builder = new VillaBuilder;
    director = new Director(builder);
    director->Construct();
    house = builder->getHouse();
    house->getDoor();
    house->getWall();
    house->getWindow();
    delete house;
    delete builder;
    delete director;

    builder = new FlatBuilder;
    director = new Director(builder);
    director->Construct();
    house = builder->getHouse();
    house->getDoor();
    house->getWall();
    house->getWindow();
    delete house;
    delete builder;
    delete director;
}

int main(void){
    test01();
    system("pause");
    return 0;
}
3.6 プロトタイプパターン#
プロトタイプパターンの原理:複雑なオブジェクトが自己複製機能を持つ(深いコピーと浅いコピーに注意が必要な場合もある)、統一されたインターフェースを持つ。
示例思考図は以下の通り:

示例コードは以下の通り:
// ここではプロトタイプパターンを示しています
#include <iostream>
using namespace std;
#include <string.h>

class Person{
public:
    virtual Person *clone(void) = 0;
    virtual void printT(void) = 0;
};

class CppProgrammer: public Person{
public:
    CppProgrammer(void){
        this->m_name = "";
        this->m_age = 0;
    }

    CppProgrammer(string name, int age){
        this->m_name = name;
        this->m_age = age;
    }

    virtual void printT(void){
        cout << "name: " << m_name << "  age: " <<  m_age << endl;
    }

    virtual Person *clone(void){
        CppProgrammer *tmp = new CppProgrammer;
        *tmp = *this;
        return tmp;
    }
private:
    string m_name;
    int m_age;
};

void test01(void){
    Person *p1 = new CppProgrammer("Tom",18);
    p1->printT();

    Person *p2 = p1->clone();
    p2->printT();
}

int main(void){
    test01();
    system("pause");
    return 0;
}
4 構造的パターン#
構造パターンの意義は、クラスとクラスを組み合わせて、より大きな構造を得ることにある。
4.1 プロキシパターン#
プロキシパターンは、委任パターンとも呼ばれ、特定のオブジェクトに代理オブジェクトを提供し、代理が元のオブジェクトへのアクセスを制御する。プロキシは、私たちの生活の中での仲介者のようなものである。
示例思考図は以下の通り:
示例コードでは、抽象クラス Subject を作成し、RealSubjectBook と DangdangProxy がそれを継承した。代理の DangdangProxy は sailbook メソッドをオーバーライドし、組み合わせの形式で RealSubjectBook オブジェクトを取得する。私たちは DangdangProxy が継承した sailbook メソッド内で RealSubjectBook のオーバーライドされたメソッドを呼び出すことができ、新しいメソッドを追加することもできる。これにより、代理が実現される。
示例コードは以下の通り:
#include <iostream>
using namespace std;

class Subject{
public:
    virtual void sailbook(void) = 0;
};

class RealSubjectBook: public Subject{
public:
    virtual void sailbook(void){
        cout << "sail book" << endl;
    }
};

class DangdangProxy: public Subject{
public:
    DangdangProxy(void){
        m_subject = new RealSubjectBook;
    }

    virtual void sailbook(void){
        dazhe();
        m_subject->sailbook();
        dazhe();
    }

    void dazhe(void){
        cout << "11.11 discount" << endl;
    }
private:
    Subject *m_subject;
};

void test01(void){
    Subject *s = NULL;
    s = new DangdangProxy;
    s->sailbook();
    delete s;
}

int main(void){
    test01();
    system("pause");
    return 0;
}
4.2 デコレーターパターン#
デコレーターパターンは、包装パターンとも呼ばれ、クライアントに透明な方法でオブジェクトの機能を拡張するもので、継承関係の代替手段である。
デコレーターパターンは、追加機能を追加する必要があるクラスをそれぞれ別のクラスに配置し、これらのクラスが修飾するオブジェクトを含むようにし、実行時にクライアントが選択的に順番にデコレータ機能でオブジェクトを包装する。
ロジックの示意図は以下の通り:

示例コードでは、RunCar、SwimCarDecorator、FlyCarDecorator がすべて基底クラス Car を継承している。RunCar の単純な show () 関数のオーバーライドとは異なり、2 つの Decorator はコンストラクタをパラメータ付きに設定し、初期化時に修飾されるオブジェクトを渡す必要があり、オーバーライドされた show 関数は、修飾された属性の show 関数を最初に呼び出す。層層修飾することで、機能を拡張し続けることができる。
示例コードは以下の通り:
#include <iostream>
using namespace std;

class Car{
public:
    virtual void show(void) = 0;
};

class RunCar: public Car{
public:
    virtual void show(void){
        cout << "I can run" << endl;
    }
};

class FlyCarDecorator: public Car{
public:
    FlyCarDecorator(Car *car){
        m_car = car;
    }

    void show(void){
        m_car->show();
        cout << "I can fly" << endl;
    }
private:
    Car *m_car;
};

class SwimCarDecorator: public Car{
public:
    SwimCarDecorator(Car *car){
        m_car = car;
    }

    void show(void){
        m_car->show();
        cout << "I can swim" << endl;
    }
private:
    Car *m_car;
};

void test01(void){
    RunCar *runcar = NULL;
    SwimCarDecorator *smCarDec = NULL;
    FlyCarDecorator *flyCarDec = NULL;

    cout << "RunCar:" << endl;
    runcar = new RunCar;
    runcar->show();
    cout << endl;

    cout << "Add Swim function:" << endl;
    smCarDec = new SwimCarDecorator(runcar);
    smCarDec->show();
    cout << endl;

    cout << "Add fly function:" << endl;
    flyCarDec = new FlyCarDecorator(smCarDec);
    flyCarDec->show();
}

int main(void){
    test01();
    system("pause");
    return 0;
}
4.3 アダプターパターン#
アダプターは、既存のクラスのインターフェースを変更でき、クライアントが希望する別のインターフェースに変換するのに適している。これにより、元々インターフェースが互換性がないために一緒に動作できないクラスを一緒に動作させることができる。
アダプターパターンのロジック図は以下の通り:

コードでは、クライアントの要求は 220v が必要であり、抽象クラス Current18v を継承し、useCurrent18v をオーバーライドすることで、useCurrent18v 内でコンストラクタから初期化されたプライベートプロパティを呼び出す。これにより、useCurrent18v は「I am 220v, welcome」と出力する。
コードは以下の通り:
#include <iostream>
using namespace std;

class Current18v{
public:
    virtual void useCurrent18v(void) = 0;
};

class Current220v{
public:
    virtual void useCurrent220v(void){
        cout << "I am 220v, welcome" << endl;
    }
};

class Adapter: public Current18v{
public:
    Adapter(Current220v *current){
        m_current = current;
    }

    virtual void useCurrent18v(void){
        cout << "adapt for Current220v" << endl;
        m_current->useCurrent220v();
    }
private:
    Current220v *m_current;
};

void test01(void){
    Current18v *c18v = NULL;
    Current220v *c220v = NULL;
    Adapter *adapter = NULL;

    c220v = new Current220v;
    adapter = new Adapter(c220v);
    adapter->useCurrent18v();

}
int main(void){
    test01();
    system("pause");
    return 0;
}
4.4 コンポジットパターン#
コンポジットパターン(Composite Pattern)は、GoF の 23 のデザインパターンの中の一つで、部分全体パターンとも呼ばれる。コンポジットパターンは、一組の類似のオブジェクトを単一のオブジェクトとして扱うために使用される。コンポジットパターンは、ツリー構造に基づいてオブジェクトを組み合わせ、部分と全体の階層を表現する。オブジェクトグループのツリー構造を作成する。
示例図は以下の通り:

示例コードでは、ファイルの性質によってフォルダファイルと通常ファイルに分け、ポインタ(ファイルポインタとフォルダポインタを含む)をリストに入れ、リスト内にリストをネストすることで、ツリー状の構造を実現する。showTree () 関数は再帰的にファイルリストを印刷する。コードは以下の通り:
#include <iostream>
using namespace std;
#include <list>
#include <string>

class IFile{
public:
    virtual void display(void) = 0;
    virtual int add(IFile *ifile) = 0;
    virtual int remove(IFile *ifile) = 0;
    virtual list<IFile*> *getChild(void) = 0;
};

class File: public IFile{
public:
    File(string name){
        m_name = name;
    }

    virtual void display(void){
        cout << m_name << endl;
    }

    virtual int add(IFile *ifile){
        return -1;
    }

    virtual int remove(IFile *ifile){
        return -1;
    }

    virtual list<IFile*> *getChild(void){
        return NULL;
    }
private:
    string m_name;
};

class Dir: public IFile{
public:
    Dir(string name){
        m_name = name;
        m_list = new list<IFile*>;
        m_list->clear();
    }

    virtual void display(void){
        cout << m_name << endl;
    }

    virtual int add(IFile *ifile){
        m_list->push_back(ifile);
        return 0;
    }

    virtual int remove(IFile *ifile){
        m_list->remove(ifile);
        return 0;
    }

    virtual list<IFile*> *getChild(void){
        return m_list;
    }
private:
    string m_name;
    list<IFile *> *m_list;
};

//ツリーを再帰的に表示
void showTree(IFile *root, int num=0){
    //根ノードを表示

    //根ノードに子がいる場合
        //子がファイルの場合、名前を表示
        //子がディレクトリの場合、ディレクトリ名を表示し、showTree(子ディレクトリ)
    if(root == NULL){
        return;
    }
    for(int i=0; i<num; i++){
        printf("\t");
    }
    //根ノードを表示
    root->display();
    list<IFile*> *mylist = root->getChild();
    if(mylist != NULL){ //ディレクトリであることを示す
        for(list<IFile*>::iterator it = mylist->begin(); it!=mylist->end(); it++){
            if((*it)->getChild() == NULL){
                for(int i=0; i<=num; i++){
                    printf("\t");
                }
                (*it)->display();
            }
            else{
                showTree(*it,num+1);
            }
        }
    }
}

void test01(void){
    Dir *root = new Dir("C");
    Dir *dir = new Dir("aaa.text");
    File *file = new File("111.dir");
    root->add(dir);
    root->add(file);
    list<IFile*> *f_list =  root->getChild();
    for(list<IFile*>::iterator it = f_list->begin(); it!=f_list->end(); it++){
        (*it)->display();
    }

    cout << "\nAll file under root:" << endl;
    Dir *dir2 = new Dir("222.dir");
    File *file2 = new File("bbb.text");
    Dir *dir3 = new Dir("333.dir");
    File *file3 = new File("ccc.text");
    dir->add(dir2);
    dir->add(file2);
    dir2->add(dir3);
    dir2->add(file3);
    showTree(root);
}

int main(void){
    test01();
    system("pause");
    return 0;
}
4.5 ブリッジパターン#
ブリッジ(Bridge)は、抽象化と実装化をデカップリングし、両者が独立して変化できるようにする。このタイプのデザインパターンは構造型パターンに属し、抽象化と実装化の間にブリッジ構造を提供することで、両者のデカップリングを実現する。
このパターンは、ブリッジとしてのインターフェースを含み、実体クラスの機能をインターフェース実装クラスから独立させる。これらの 2 つのタイプのクラスは構造的に変更されても互いに影響を与えない。
思考示意図は以下の通り:

示例コードでは、Engine と Car を抽象化し、Car クラスが Engine のポインタを保持することで、Car はインターフェースプログラミングに適合する。この場合、Car のサブクラスと Engine のサブクラスは独立して変化でき、オブジェクトに影響を与えない。
以下の通り:
#include <iostream>
using namespace std;

//抽象クラスEngine
class Engine{
public:
    virtual void installEngine(void) = 0;
};

class Engine4400c: public Engine{
public:
    virtual void installEngine(void){
        cout << "I am Engine4400c, install completed" << endl;
    }
};

class Engine4500c: public Engine{
public:
    virtual void installEngine(void){
        cout << "I am Engine4500c, install completed" << endl;
    }
};

class Car{
public:
    Car(Engine *engine){
        m_engine = engine;
    }

    virtual void installEngine(void) = 0;
protected:
    Engine *m_engine;
};

class BMW5: public Car{
public:
    BMW5(Engine *engine): Car(engine){

    }

    virtual void installEngine(void){
        m_engine->installEngine();
    }
};

class BMW7: public Car{
public:
    BMW7(Engine *engine): Car(engine){

    }

    virtual void installEngine(void){
        m_engine->installEngine();
    }
};

void test01(void){
    Engine *engine = NULL;
    BMW7 *bmw7 = NULL;

    engine = new Engine4500c;
    bmw7 = new BMW7(engine);
    bmw7->installEngine();
}

int main(void){
    test01();
    system("pause");
    return 0;
}
4.6 ファサードパターン#
ファサード(Facade)パターンは、門面パターンとも呼ばれ、複数の複雑なサブシステムに一貫したインターフェースを提供し、これらのサブシステムがより簡単にアクセスできるようにするパターンである。このパターンは外部に統一されたインターフェースを持ち、外部アプリケーションは内部サブシステムの具体的な詳細を気にする必要がないため、アプリケーションの複雑さを大幅に低下させ、プログラムの保守性を向上させる。
思考図は以下の通り:

示例では、元の実行時に必要な各プロセスを一つのクラスにカプセル化し、呼び出す際には複雑な操作を実行するのではなく、直接 Facade クラスを使用して必要なプロセスを操作する。コードは以下の通り:
#include <iostream>
using namespace std;

class SubSystemA{
public:
    void doThing(void){
        cout << "SubSystemA run" << endl;
    }
};

class SubSystemB{
public:
    void doThing(void){
        cout << "SubSystemB run" << endl;
    }
};

class SubSystemC{
public:
    void doThing(void){
        cout << "SubSystemC run" << endl;
    }
};

class Facade{
public:
    Facade(void){
        sysa = new SubSystemA;
        sysb = new SubSystemB;
        sysc = new SubSystemC;
    }

    ~Facade(void){
        delete sysa;
        delete sysb;
        delete sysc;
    }

    void doThing(void){
        sysa->doThing();
        sysb->doThing();
        sysc->doThing();
    }
private:
    SubSystemA *sysa;
    SubSystemB *sysb;
    SubSystemC *sysc;
};

void test01(void){
    Facade *facade = new Facade;
    facade->doThing();
    delete facade;
}

int main(void){
    test01();
    system("pause");
    return 0;
}
4.7 フライウェイトパターン#
-
フライウェイトパターン(Flyweight Pattern)は、共有技術を使用して大量の細かいオブジェクトを効果的にサポートする。
-
システムの底層開発でよく使用され、システムの性能問題を解決する。データベース接続プールのように、すでに作成された接続オブジェクトがあり、必要なものがあればそれを直接使用し、再作成を避け、必要がなければ新しいオブジェクトを作成する。
-
フライウェイトパターンは、重複オブジェクトのメモリ浪費の問題を解決し、システムのメモリを削減し、効率を向上させることができる。
ロジック思考図は以下の通り:

示例コードでは、FlyWeightFactor クラスがあり、その内部に getTeacher メソッドがある。このメソッドを通じてオブジェクトを作成し、すでにこのシリアル番号に対応するオブジェクトがあれば新たに作成する必要はなく、マップから取得する。存在しない場合は新しいオブジェクトを作成する。このパターンを通じて、オブジェクトのメモリ浪費の問題を解決し、効率を向上させる。
#include <iostream>
using namespace std;
#include <map>

class Person{
public:
    Person(string name, int age){
        m_name = name;
        m_age = age;
    }

    virtual void printT(void) = 0;
protected:
    string m_name;
    int m_age;
};

class Teacher: public Person{
public:
    Teacher(string name, int age, string id): Person(name, age){
        m_id = id;
    }

    void printT(void){
        cout << "name: " << m_name << "  age: " << m_age << "  id: " << m_id << endl;
    }
private:
    string m_id;
};

class FlyWeightFactor{
public:
    FlyWeightFactor(void){
        m_map1.clear();
    }

    ~FlyWeightFactor(void){
        for(map<string,Person*>::iterator it = m_map1.begin(); it != m_map1.end(); it++){
            delete (it->second);
        }
    }

    Person *getTeacher(string id){
        map<string, Person*>::iterator it;
        it = m_map1.find(id);
        Person *tmp = NULL;
        if(it == m_map1.end()){
            string name;
            int age;
            cout << "Please input the name of teacher" << endl;
            cin >> name;
            cout << "Please input the age of the teacher" << endl;
            cin >> age;
            tmp = new Teacher(name, age, id);
            m_map1.insert(pair<string, Person*>(id, tmp));
        }
        else{
            tmp = it->second;
        }
        return tmp;
    }
private:
    map<string, Person*> m_map1;
};

void test01(void){
    FlyWeightFactor *fwf = NULL;
    Person *p1 = NULL;
    Person *p2 = NULL;
    Person *p3 = NULL;

    fwf = new FlyWeightFactor;
    p1 = fwf->getTeacher("10");
    p1->printT();
    p2 = fwf->getTeacher("9");
    p2->printT();
    p3 = fwf->getTeacher("9");
    p2->printT();
}

int main(void){
    test01();
    system("pause");
    return 0;
}
5 行動パターン#
5.1 テンプレートパターン#
テンプレートメソッドは、特定のステップアルゴリズムの中の必要な処理を抽象メソッドに委任する。サブクラスが抽象メソッドの異なる実装を通じて、アルゴリズムの動作を変更することができる。
まとめ:
抽象クラス内で操作手順を統一し、インターフェースを規定する。サブクラスにインターフェースを実装させる。これにより、各具体的なサブクラスと操作手順を接続することができる。
ロジック思考図は以下の通り: