C++ 设计模式#
1 设计模式基础#
1.1 设计模式基本原则#
最终目的: 高内聚,低耦合
(1)开放封闭原则(OCP, Open For Externsion, Closed For Mod)
类的改动是通过增加代码进行,而不是修改代码。
(2)单一职责原则(SRP, Single Responsibility Principle)
类的职责要单一,对外只提供一种功能,而引起类变化的原因都应该只有一个。
(3)依赖倒置原则(DIP, Dependence Inversion Principle)
依赖于抽象(接口),不要依赖具体实现(类),也就是针对接口编程。
(4)接口隔离原则(ISP, Interface Segegation Principle)
不应该强迫客户的程序依赖他们不需要的接口方法,一个接口应该只提供一种对外功能,不应该 把所有操作封装到一个接口中去。
(5)里氏替换原则(LSP, Liskov Substitution Principle)
任何抽象类出现的地方都可以用他的实现类进行替换,实际就是虚拟机制,语言级别实现面向对象功能。
(6)优先使用组合而不是继承原则(CAPP, Composite/Aggregate Reuse Principle)
如果使用继承,会导致父类的任何变化都可能影响到子类的行为。
如果使用对象组合,就降低了这种依赖
(7)迪米特法则(LOD, Law Of Demeter)
一个对象应当对其它对象尽可能少的了解,从而降低各个对象之间的耦合,提高系统的可维护性。例如在一个程序中,各个模块之间相互调用时,通常会提供一个统一的接口来实现。这样其他模块不需要了解另外一个模块的内部实现细节,这样当一个模块内的实现发生改变时,不会影响其它模块的使用。
2 依赖倒置和迪米特法则#
2.1 依赖倒置(DIP, Dependence Inversion Principle)#
在下面的程序里,Computer 类并不依赖具体的类,而是依赖三个抽象类。通过对三个类的重写,实现我们想要的功能。我们用重写的子类初始化 Computer, 减轻了依赖,增加了灵活性。
如图所示:

代码如下:
// 依赖倒置原则
// 依赖于抽象(接口),不要依赖具体实现(类),也就是针对接口编程。

#include <iostream>
using namespace std;

//抽象类HardDisk
class HardDisk{
public:
    virtual void work() = 0;
};

//抽象类Memory
class Memory{
public:
    virtual void work() = 0;
};

//抽象类Cpu
class Cpu{
public:
    virtual void work() = 0;
};

//继承HardDisk,并重写work
class JSDhardDisk: public HardDisk{
public:
    void work(){
        cout << "JSDhardDisk is working" << endl;
    }
};

//继承Memory,并重写work
class XSMemory: public Memory{
public:
    void work(){
        cout << "XSMemory is working" << endl;
    }
};

//继承Cpu,并重写work
class InterCpu: public Cpu{
public:
    void work(){
        cout << "InterCpu is working" << endl;
    }
};

//定义Computer类,使用的是组合的方式,而不是继承
class Computer{
public:
    //构造函数,初始化三个组合成员
    Computer(HardDisk *hardDisk, Memory *memory, Cpu *cpu){
        this->m_hardDisk = hardDisk;
        this->m_memory = memory;
        this->m_cpu = cpu;
    }
    //执行函数
    void work(){
        m_hardDisk->work();
        m_memory->work();
        m_cpu->work();
    }
private:
    //定义三个类,组合在Computer里
    HardDisk *m_hardDisk;
    Memory *m_memory;
    Cpu *m_cpu;
};

//测试函数
void test01(void){
    //定义三个抽象类指针
    HardDisk *hardDisk = NULL;
    Memory *memory = NULL;
    Cpu *cpu = NULL;

    //用其子类的构造
    hardDisk = new JSDhardDisk;
    memory = new XSMemory;
    cpu = new InterCpu;

    Computer computer(hardDisk, memory, cpu);
    computer.work();
    delete cpu;
    delete memory;
    delete hardDisk;
}

//主函数
int main(void){
    test01();
    system("pause");
    return 0;
}
2.2 迪米特法则(LOD, Law Of Demeter)#
方法一:

代码如下:
#include <iostream>
using namespace std;

class Stranger{
public:
    void speak(void){
        cout << "I am Stranger" << endl;
    }
};

class Friend{
public:
    void speak(void){
        cout << "I am your friend" << endl;
    }
    Stranger* get_Stranger(){
        return new Stranger();
    }
};

//Tom不直接访问Stranger,而是通过Friend
class Tom{
public:
    void speak(Friend &fri){
        fri.speak();
        Stranger *stranger = fri.get_Stranger();
        stranger->speak();
    }
};

void test01(void){
    Tom tom;
    Stranger stranger;
    Friend fri;
    tom.speak(fri);
}

int main(void){
    test01();
    system("pause");
    return 0;
}
方法二:

#include <iostream>
using namespace std;

class Stranger{
public:
    void play(void){
        cout << "I am Stranger" << endl;
    }
};

class Friend{
public:
    void play(void){
        cout << "I am your friend" << endl;
    }
    void playWithStranger(void){
        Stranger *stranger = new Stranger;
        stranger->play();
    }
};

class Tom{
public:
    void play(void){
        cout << "I am Tom" << endl;
    }
    void setFriend(Friend *fri){
        this->m_fri = fri;
    }
    void playWithFri(void){
        m_fri->play();
    }
    void playWithStranger(void){
        m_fri->playWithStranger();
    }
private:
    Friend *m_fri;
};

void test01(void){
    Tom tom;
    Friend *fri;
    tom.setFriend(fri);
    tom.playWithStranger();
    delete fri;
}

int main(void){
    test01();
    system("pause");
    return 0;
}
方法三:

Tom 依赖于 Stranger 的抽象,并不依赖具体的 Stranger.
#include <iostream>
using namespace std;

class Stranger{
public:
    virtual void play(void) = 0;
};

class StrangerA: public Stranger{
public:
    void play(void){
        cout << "I am StrangerA" << endl;
    }
};

class Friend{
public:
    void play(void){
        cout << "I am your friend" << endl;
    }
};

class Tom{
public:
    void setFriend(Friend *fri){
        this->m_fri = fri;
    }
    void setStranger(Stranger *stranger){
        this->m_stranger = stranger;
    }
    void play(void){
        cout << "I am Tom" << endl;
        m_fri->play();
        m_stranger->play();
    }
private:
    Friend *m_fri;
    Stranger *m_stranger;
};

void test01(void){
    Tom tom;
    Friend *fri = new Friend();
    Stranger *stranger = new StrangerA();

    tom.setFriend(fri);
    tom.setStranger(stranger);
    tom.play();
    delete stranger;
    delete fri;
}

int main(void){
    test01();
    system("pause");
    return 0;
}
3 创建型模式#
3.1 单例模式#
3.1.1 懒汉模式和饿汉模式#
单例化通过将构造函数设置为私有,所以只能在类内部构造。类中设置了一个静态变量,通过静态函数对其进行初始化,从而保证一个类只能实例化一个对象。
懒汉模式在全局处初始化静态对象,赋值其为 NULL。只有在调用其静态函数时才进行构造,故称其为懒汉模式
懒汉模式代码如下:
#include <iostream>
using namespace std;

class Singleton{
public:
    static Singleton *getInstance(void){
        if(m_singleton == NULL){
            m_singleton = new Singleton();
        }
        return m_singleton;
    }
    static void freeInstance(void){
        if(m_singleton != NULL){
            delete m_singleton;
            m_singleton = NULL;
        }
    }
private:
    static Singleton* m_singleton;
    Singleton(void){
        cout << "The structure of Singleton" << endl;
    }
};

Singleton* Singleton::m_singleton = NULL;

void test01(void){
    Singleton *p1 = Singleton::getInstance();
    Singleton *p2 = Singleton::getInstance();
    if(p1 == p2){
        cout << "p1 = p2" << endl;
    }
    else{
        cout << "p1 != p2" << endl;
    }
}

int main(void){
    test01();
    system("pause");
    return 0;
}
饿汉模式在全局处初始化静态对象。与懒汉模式的不同点在于:
  	static Singleton *getInstance(void){
        return m_singleton;
    }

Singleton* Singleton::m_singleton = new Singleton();
3.1.2 懒汉模式多线程#
懒汉模式由于他只会在调用其提供的接口才进行构造,并且一个类只能构造一个函数。在多线程下,当构造函数执行时间太长(超过单个线程分配的时间片),时间片结束后,后面的线程执行判断需要构造的对象依然为 NULL, 后面的线程会并发地对通一个对象进行构造。这样一来,单个对象会被构造多次,便失去地单例的特性。
//懒汉模式在多线程下的问题
#include <iostream>
using namespace std;
#include <windows.h>
#include <process.h>

class Singleton{
public:
    static Singleton *getInstance(void){
        if(m_singleton == NULL){
            count++;
            m_singleton = new Singleton();
        }
        return m_singleton;
    }
    static void freeInstance(void){
        if(m_singleton != NULL){
            delete m_singleton;
            m_singleton = NULL;
        }
    }
    static void printS(void){
        cout << "Singleton printS test\n";
    }
private:
    static Singleton* m_singleton;
    static int count;
    Singleton(void){
        cout << "The structure of Singleton(begin)\n";
        cout << "The structure of Singleton(end)\n";
        Sleep(1000);
    }
};

Singleton* Singleton::m_singleton = NULL;
int Singleton::count = 0;

void myThreadFunc(void*){
    Singleton::getInstance()->printS();
}

void test01(void){
    HANDLE hThread[10];
    for(int i=0; i<3; i++){
        hThread[i] = (HANDLE)_beginthread(myThreadFunc, 0, NULL);
    }
    for(int i=0; i<3; i++){
        WaitForSingleObject(hThread[i],INFINITE);
    }
    Singleton::freeInstance();
}

int main(void){
    test01();
    system("pause");
    return 0;
}
3.1.3 懒汉模式多线程同步优化#
懒汉模式在多线程下优化,通过的是设置临界区,并且执行双判断。优化懒汉模式,保证一个类只能实例化一个对象。从而避免重复构造,使其符合单例的特性。
核心代码如下:
CRITICAL_SECTION cs;
InitializeCriticalSection(&cs); //初始化临界区

	static Singleton *getInstance(void){
        if(m_singleton == NULL){
            EnterCriticalSection(&cs); //进入临界区
            if(m_singleton == NULL){
                m_singleton = new Singleton();
            }
            LeaveCriticalSection(&cs); //离开临界区
        }
        return m_singleton;
    }
3.2 简单工厂模式#
简单工厂模式,不是标准设计模式,因为他不符合开闭原则,但是它简单易用
逻辑示意图如下:

示例代码在 Factor 里的 public 方法构造对象,返回值是抽象类的指针,通过这个类的多态性,返回不同类型的指针,实现工厂化生产对象。代码如下:
#include <iostream>
using namespace std;
#include <string.h>

//定义抽象类
class Fruit{
public:
    virtual void getFruit(void) = 0;
};

//继承抽象类,重写getFruit
class Banana: public Fruit{
public:
    void getFruit(void){
        cout << "I am Banana" << endl;
    }
};

//继承抽象类,重写getFruit
class Apple: public Fruit{
public:
    void getFruit(void){
        cout << "I am Apple" << endl;
    }
};

//定义工厂,通过里面的公共函数creat进行实例对象构造
class Factor{
public:
    Fruit *creat(string p){
        if(p == "Banana"){
            return new Banana;
        }
        else if(p == "Apple"){
            return new Apple;
        }
        else{
            cout << "Not supported" << endl;
            return NULL;
        }
    }
};

//测试函数
void test01(void){
    Factor *fac = new Factor;
    Fruit *fru = NULL;

    fru = fac->creat("Banana");
    fru->getFruit();
    delete fru;

    fru = fac->creat("Apple");
    fru->getFruit();
    delete fru;

    delete fac;

}

int main(void){
    test01();
    system("pause");
    return 0;
}
3.3 工厂模式#
本例中,工厂模式通过对两个抽象类进行实现,分别是抽象水果类和抽象工厂类。先进行抽象工厂的实例化,生成实例化的工厂,在通过这个工厂生产指定水果。一个工厂生产一种水果,想要添加生产水果的类别时,则再加上一个水果类和一个该类的工厂,而不需要修改其它代码,符合开闭原则,使得代码可以灵活拓展。
思维图如下:

示例代码如下:
#include <iostream>
using namespace std;

//定义抽象类Fruit
class Fruit{
public:
    virtual void sayName(void) = 0;
};

//继承Fruit, 重写sayName,定义Banana.
class Banana: public Fruit{
public:
    void sayName(void){
        cout << "I am Banana" << endl;
    }
};

//继承Fruit, 重写sayName,定义Apple.
class Apple: public Fruit{
public:
    void sayName(void){
        cout << "I am Apple" << endl;
    }
};

//定义抽象工厂AbFactor
class AbFactor{
public:
    virtual Fruit *creat(void) = 0;
};

//继承抽象工厂,重写creat,定义BananaFactor
class BananaFactor: public AbFactor{
public:
    Fruit *creat(void){
        return new Banana;
    }
};

//继承抽象工厂,重写creat,定义AppleFactor
class AppleFactor: public AbFactor{
public:
    Fruit *creat(void){
        return new Apple;
    }
};

/////////////////////////////////////////////////////////////////
//使用工厂模式后添加新的类时,不用修改原来代码,符合了开闭原则
class Pear: public Fruit{
public:
    void sayName(void){
        cout << "I am pear" << endl;
    }
};

class PearFactor: public AbFactor{
    Fruit *creat(void){
        return new Pear;
    }
};

//测试函数
void test01(void){
    AbFactor *factor = NULL;
    Fruit *fruit = NULL;

    factor = new BananaFactor;
    fruit = factor->creat();
    fruit->sayName();
    delete fruit;
    delete factor;

    factor = new AppleFactor;
    fruit = factor->creat();
    fruit->sayName();
    delete fruit;
    delete factor;

    factor = new PearFactor;
    fruit = factor->creat();
    fruit->sayName();
    delete fruit;
    delete factor;
}

int main(void){
    test01();
    system("pause");
    return 0;
}
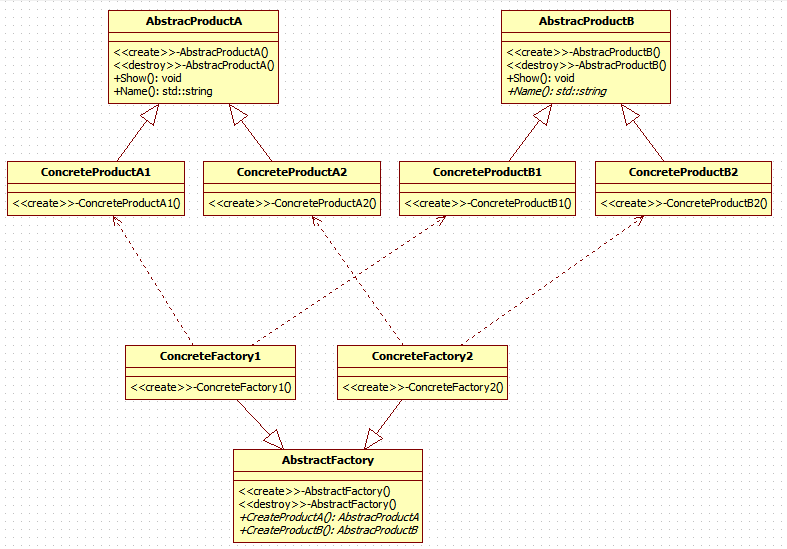
3.4 抽象工厂#
工厂模式只能生产一个产品(要么香蕉,要么苹果)抽象工厂可以一下生产一个产品族(里面有很多产品组成)和工厂模式比起来,抽象工厂可以生产更多,但是可拓展性变差了。
示例代码里同时抽象了工厂和水果,以此分为了南方工厂和北方工厂,两个厂都生产 Apple 和 Banana, 思路图如下所示:
示例代码如下:
#include <iostream>
using namespace std;

//抽象类Fruit
class Fruit{
public:
    virtual void sayName(void) = 0;
};

//抽象工厂
class AbFactory{
public:
    virtual Fruit *creatBanana(void) = 0;
    virtual Fruit *creatApple(void) = 0;
};

class NorthBanana: public Fruit{
public:
    void sayName(void){
        cout << "I am Banana, I am from North" << endl;
    }
};

class NorthApple: public Fruit{
public:
    void sayName(void){
        cout << "I am Apple, I am from North" << endl;
    }
};

class SouthBanana: public Fruit{
public:
    void sayName(void){
        cout << "I am Banana, I am from south" << endl;
    }
};

class SouthApple: public Fruit{
public:
    void sayName(void){
        cout << "I am Apple, I am from south" << endl;
    }
};

class NorthFactor: public AbFactory{
public:
    Fruit *creatBanana(void){
        return new NorthBanana;
    }

    Fruit *creatApple(void){
        return new NorthApple;
    }
};

class SouthFactor: public AbFactory{
public:
    Fruit *creatBanana(void){
        return new SouthBanana;
    }

    Fruit *creatApple(void){
        return new SouthApple;
    }
};

//测试程序
void test01(void){
    AbFactory *factor = NULL;
    Fruit *fruit = NULL;

    factor = new NorthFactor;

    fruit = factor->creatApple();
    fruit->sayName();
    delete fruit;
    fruit = factor->creatBanana();
    fruit->sayName();
    delete fruit;
    delete factor;

    factor = new SouthFactor();

    fruit = factor->creatApple();
    fruit->sayName();
    delete fruit;
    fruit = factor->creatBanana();
    fruit->sayName();
    delete fruit;
    delete factor;
}

int main(void){
    test01();
    system("pause");
    return 0;
}
3.5 建造者模式#
适用情况:一个对象构建比较复杂,将一个对象的构造和表示进行分离。
建造者模式,通过一个指挥者控制建造者进行建造,建造流程在指挥者手里。建造者不用理会建造的具体情况,它只管建造所需的对象。
具体逻辑在于将建造者传入指挥者,并且赋值给指挥者的私有属性,在指挥者内部调用建造者的属性对对象进行建造。建造后 Builder 的属性已经改变,通过 getHouse () 获取到 m_house,通过各类 get 方法,可以查询到建筑情况。
思路图如下:

代码如下:
#include <iostream>
using namespace std;

class House{
public:
    void setDoor(string door){
        this->m_door = door;
    }

    void setWall(string wall){
        this->m_wall = wall;
    }

    void setWindow(string window){
        this->m_window = window;
    }

    string getDoor(void){
        cout << m_door << endl;
        return m_door;
    }

    string getWall(void){
        cout << m_wall << endl;
        return m_wall;
    }

    string getWindow(void){
        cout << m_window << endl;
        return m_window;
    }
private:
    string m_door;
    string m_wall;
    string m_window;
};

//抽象建筑
class Builder{
public:
    virtual void buildWall(void) = 0;
    virtual void buildDoor(void) = 0;
    virtual void buildWindow(void) = 0;
    virtual House *getHouse(void) = 0;
};

//具体建筑Flat
class FlatBuilder: public Builder{
public:
    FlatBuilder(void){
        this->m_house = new House;
    }

    void buildWall(void){
        m_house->setWall("Flat wall");
    }

    void buildDoor(void){
        m_house->setDoor("Flat door");
    }

    void buildWindow(void){
        m_house->setWindow("Flat window");
    }

    House *getHouse(void){
        return this->m_house;
    }
private:
    House *m_house;
};

//具体建筑Villa
class VillaBuilder: public Builder{
public:
    VillaBuilder(void){
        this->m_house = new House;
    }

    void buildWall(void){
        m_house->setWall("Villa wall");
    }

    void buildDoor(void){
        m_house->setDoor("Villa door");
    }

    void buildWindow(void){
        m_house->setWindow("Villa window");
    }

    House *getHouse(void){
        return m_house;
    }
private:
    House *m_house;
};

//设计者(指挥者),负责建造逻辑
//建造者,干具体的活
class Director{
public:
    Director(Builder *builder){
        this->m_builder = builder;
    }

    void Construct(void){
        m_builder->buildWall();
        m_builder->buildWindow();
        m_builder->buildDoor();
    }
private:
    Builder *m_builder;
};

//测试程序
void test01(void){
    House *house = NULL;
    Builder *builder = NULL;
    Director *director = NULL;

    builder = new VillaBuilder;
    director = new Director(builder);
    director->Construct();
    house = builder->getHouse();
    house->getDoor();
    house->getWall();
    house->getWindow();
    delete house;
    delete builder;
    delete director;

    builder = new FlatBuilder;
    director = new Director(builder);
    director->Construct();
    house = builder->getHouse();
    house->getDoor();
    house->getWall();
    house->getWindow();
    delete house;
    delete builder;
    delete director;
}

int main(void){
    test01();
    system("pause");
    return 0;
}
3.6 原型模式#
原型模式原理:一个复杂对象,具有自我复制作用(有时候要注意深浅拷贝),统一一套接口。
示例思路图如下:

示例代码如下:
// 此处演示的是原型模式
#include <iostream>
using namespace std;
#include <string.h>

class Person{
public:
    virtual Person *clone(void) = 0;
    virtual void printT(void) = 0;
};

class CppProgrammer: public Person{
public:
    CppProgrammer(void){
        this->m_name = "";
        this->m_age = 0;
    }

    CppProgrammer(string name, int age){
        this->m_name = name;
        this->m_age = age;
    }

    virtual void printT(void){
        cout << "name: " << m_name << "  age: " <<  m_age << endl;
    }

    virtual Person *clone(void){
        CppProgrammer *tmp = new CppProgrammer;
        *tmp = *this;
        return tmp;
    }
private:
    string m_name;
    int m_age;
};

void test01(void){
    Person *p1 = new CppProgrammer("Tom",18);
    p1->printT();

    Person *p2 = p1->clone();
    p2->printT();
}

int main(void){
    test01();
    system("pause");
    return 0;
}
4 结构型模式#
结构模式的意义在于让类和类进行组合,获得更大的结构。
4.1 代理模式#
代理模式又叫委托模式,是为某个对象提供代理对象,并且由代理控制对原对象的访问。代理通俗地讲就是我们生活中地中介。
示例思路图如下:
示例代码里创建了一个抽象类 Subject,被 RealSubjectBook 和 DangdangProxy 继承了。代理 DangdangProxy 重写了 sailbook 这个方法,并且通过组合地形式获得了一个 RealSubjectBook 对象。我们可以在 DangdangProxy 继承的 sailbook 方法里调用 RealSubjectBook 重写的方法,并且可以添加新的方法,这样就实现了代理。
示例代码如下:
#include <iostream>
using namespace std;

class Subject{
public:
    virtual void sailbook(void) = 0;
};

class RealSubjectBook: public Subject{
public:
    virtual void sailbook(void){
        cout << "sail book" << endl;
    }
};

class DangdangProxy: public Subject{
public:
    DangdangProxy(void){
        m_subject = new RealSubjectBook;
    }

    virtual void sailbook(void){
        dazhe();
        m_subject->sailbook();
        dazhe();
    }

    void dazhe(void){
        cout << "11.11 discount" << endl;
    }
private:
    Subject *m_subject;
};

void test01(void){
    Subject *s = NULL;
    s = new DangdangProxy;
    s->sailbook();
    delete s;
}

int main(void){
    test01();
    system("pause");
    return 0;
}
4.2 装饰模式#
装饰模式又叫包装模式。通过一种对客户端透明的方式来扩展对象的功能,是继承关系的一个替换方案。
装饰模式就是把要添加的附加功能分别放在单独的类中,并让这里类包含它所要修饰的对象,当需要执行时,客户端有选择地,按顺序地使用装饰功能包装对象。
逻辑示例图如下:

示例代码中的 RunCar,SwimCarDecorator,FlyCarDecorator 都继承了基类 Car。不同于 RunCar 的单纯重写 show () 函数,两个 Decorator 把构造函数设置为有参构造,初始化时需要传入被装饰的对象,并且重写的 show 函数,会先调用被修饰的属性的 show 函数。通过层层修饰,可以不断扩充功能。
示例代码如下:
#include <iostream>
using namespace std;

class Car{
public:
    virtual void show(void) = 0;
};

class RunCar: public Car{
public:
    virtual void show(void){
        cout << "I can run" << endl;
    }
};

class FlyCarDecorator: public Car{
public:
    FlyCarDecorator(Car *car){
        m_car = car;
    }

    void show(void){
        m_car->show();
        cout << "I can fly" << endl;
    }
private:
    Car *m_car;
};

class SwimCarDecorator: public Car{
public:
    SwimCarDecorator(Car *car){
        m_car = car;
    }

    void show(void){
        m_car->show();
        cout << "I cam swim" << endl;
    }
private:
    Car *m_car;
};

void test01(void){
    RunCar *runcar = NULL;
    SwimCarDecorator *smCarDec = NULL;
    FlyCarDecorator *flyCarDec = NULL;

    cout << "RunCar:" << endl;
    runcar = new RunCar;
    runcar->show();
    cout << endl;

    cout << "Add Swim function:" << endl;
    smCarDec = new SwimCarDecorator(runcar);
    smCarDec->show();
    cout << endl;

    cout << "Add fly function:" << endl;
    flyCarDec = new FlyCarDecorator(smCarDec);
    flyCarDec->show();
}

int main(void){
    test01();
    system("pause");
    return 0;
}
4.3 适配器模式#
适配器可以改变已有类的接口,适用于将类的接口转化为客户端希望的另外一个接口,使得原本由于接口不兼容而导致不能一起工作的那些类可以一起工作。
适配器模式逻辑图如下:

代码里客户端的需求是需要 220v,我们通过继承抽象类 Current18v,并重写 useCurrent18v,在 useCurrent18v 里我们将从构造函数里初始化的私有属性进行方法调用。于是 useCurrent18v 便打印了”I am 220v, welcome“。
代码如下:
#include <iostream>
using namespace std;

class Current18v{
public:
    virtual void useCurrent18v(void) = 0;
};

class Current220v{
public:
    virtual void useCurrent220v(void){
        cout << "I am 220v, welcome" << endl;
    }
};

class Adapter: public Current18v{
public:
    Adapter(Current220v *current){
        m_current = current;
    }

    virtual void useCurrent18v(void){
        cout << "adapt for Current220v" << endl;
        m_current->useCurrent220v();
    }
private:
    Current220v *m_current;
};

void test01(void){
    Current18v *c18v = NULL;
    Current220v *c220v = NULL;
    Adapter *adapter = NULL;

    c220v = new Current220v;
    adapter = new Adapter(c220v);
    adapter->useCurrent18v();

}
int main(void){
    test01();
    system("pause");
    return 0;
}
4.4 组合模式#
组合模式(Composite Pattern),又叫部分整体模式,是 GoF 的 23 种设计模式中的一种结构型设计模式。 组合模式 是用于把一组相似的对象当作一个单一的对象。组合模式依据树形结构来组合对象,用来表示部分以及整体层次。它创建了对象组的树形结构。
示例图如下:

示例代码通过文件的性质分为了文件夹文件和普通文件,通过将指针(包含文件指针和文件夹指针)放入 list 中并在 list 中嵌套 list,以此实现树状结构。showTree () 函数通过递归,打印出了文件列表。代码如下
#include <iostream>
using namespace std;
#include <list>
#include <string>

class IFile{
public:
    virtual void display(void) = 0;
    virtual int add(IFile *ifile) = 0;
    virtual int remove(IFile *ifile) = 0;
    virtual list<IFile*> *getChild(void) = 0;
};

class File: public IFile{
public:
    File(string name){
        m_name = name;
    }

    virtual void display(void){
        cout << m_name << endl;
    }

    virtual int add(IFile *ifile){
        return -1;
    }

    virtual int remove(IFile *ifile){
        return -1;
    }

    virtual list<IFile*> *getChild(void){
        return NULL;
    }
private:
    string m_name;
};

class Dir: public IFile{
public:
    Dir(string name){
        m_name = name;
        m_list = new list<IFile*>;
        m_list->clear();
    }

    virtual void display(void){
        cout << m_name << endl;
    }

    virtual int add(IFile *ifile){
        m_list->push_back(ifile);
        return 0;
    }

    virtual int remove(IFile *ifile){
        m_list->remove(ifile);
        return 0;
    }

    virtual list<IFile*> *getChild(void){
        return m_list;
    }
private:
    string m_name;
    list<IFile *> *m_list;
};


//递归地显示树
void showTree(IFile *root, int num=0){
    //显示根节点

    //若根节点有孩子
        //如果孩子是文件,显示名字
        //若孩子是目录,显示目录名字,showTree(子目录)
    if(root == NULL){
        return;
    }
    for(int i=0; i<num; i++){
        printf("\t");
    }
    //显示根节点
    root->display();
    list<IFile*> *mylist = root->getChild();
    if(mylist != NULL){ //说明是一个目录
        for(list<IFile*>::iterator it = mylist->begin(); it!=mylist->end(); it++){
            if((*it)->getChild() == NULL){
                for(int i=0; i<=num; i++){
                    printf("\t");
                }
                (*it)->display();
            }
            else{
                showTree(*it,num+1);
            }
        }
    }
}

void test01(void){
    Dir *root = new Dir("C");
    Dir *dir = new Dir("aaa.text");
    File *file = new File("111.dir");
    root->add(dir);
    root->add(file);
    list<IFile*> *f_list =  root->getChild();
    for(list<IFile*>::iterator it = f_list->begin(); it!=f_list->end(); it++){
        (*it)->display();
    }

    cout << "\nAll file under root:" << endl;
    Dir *dir2 = new Dir("222.dir");
    File *file2 = new File("bbb.text");
    Dir *dir3 = new Dir("333.dir");
    File *file3 = new File("ccc.text");
    dir->add(dir2);
    dir->add(file2);
    dir2->add(dir3);
    dir2->add(file3);
    showTree(root);
}

int main(void){
    test01();
    system("pause");
    return 0;
}
4.5 桥接模式#
桥接(Bridge)是用于把抽象化与实现化解耦,使得二者可以独立变化。这种类型的设计模式属于结构型模式,它通过提供抽象化和实现化之间的桥接结构,来实现二者的解耦。
这种模式涉及到一个作为桥接的接口,使得实体类的功能独立于接口实现类。这两种类型的类可被结构化改变而互不影响。
思路示例图如下:

示例代码中抽象了 Engine 和 Car,让 Car 类中持有 Engine 的指针,于是 Car 则符合了面向接口编程。在这种情况下,Car 的子类和 Engine 的子类可以单独变化而对对象没有影响。
如下:
#include <iostream>
using namespace std;

//抽象类Engine
class Engine{
public:
    virtual void installEngine(void) = 0;
};

class Engine4400c: public Engine{
public:
    virtual void installEngine(void){
        cout << "I am Engine4400c, install completed" << endl;
    }
};

class Engine4500c: public Engine{
public:
    virtual void installEngine(void){
        cout << "I am Engine4500c, install completed" << endl;
    }
};

class Car{
public:
    Car(Engine *engine){
        m_engine = engine;
    }

    virtual void installEngine(void) = 0;
protected:
    Engine *m_engine;
};

class BMW5: public Car{
public:
    BMW5(Engine *engine): Car(engine){

    }

    virtual void installEngine(void){
        m_engine->installEngine();
    }
};

class BMW7: public Car{
public:
    BMW7(Engine *engine): Car(engine){

    }

    virtual void installEngine(void){
        m_engine->installEngine();
    }
};

void test01(void){
    Engine *engine = NULL;
    BMW7 *bmw7 = NULL;

    engine = new Engine4500c;
    bmw7 = new BMW7(engine);
    bmw7->installEngine();
}

int main(void){
    test01();
    system("pause");
    return 0;
}
4.6 外观模式#
外观(Facade)模式又叫作门面模式,是一种通过为多个复杂的子系统提供一个一致的接口,而使这些子系统更加容易被访问的模式。该模式对外有一个统一接口,外部应用程序不用关心内部子系统的具体细节,这样会大大降低应用程序的复杂度,提高了程序的可维护性。
思路图如下:

示例中,把原来执行时需要的各个流程封装到了一个类中,这时我们再调用时就不需要执行繁杂的操作,而是直接用 Facade 这个类操作我们需要的流程。代码如下:
#include <iostream>
using namespace std;

class SubSystemA{
public:
    void doThing(void){
        cout << "SubSystemA run" << endl;
    }
};

class SubSystemB{
public:
    void doThing(void){
        cout << "SubSystemB run" << endl;
    }
};

class SubSystemC{
public:
    void doThing(void){
        cout << "SubSystemC run" << endl;
    }
};

class Facade{
public:
    Facade(void){
        sysa = new SubSystemA;
        sysb = new SubSystemB;
        sysc = new SubSystemC;
    }

    ~Facade(void){
        delete sysa;
        delete sysb;
        delete sysc;
    }

    void doThing(void){
        sysa->doThing();
        sysb->doThing();
        sysc->doThing();
    }
private:
    SubSystemA *sysa;
    SubSystemB *sysb;
    SubSystemC *sysc;
};

void test01(void){
    Facade *facade = new Facade;
    facade->doThing();
    delete facade;
}

int main(void){
    test01();
    system("pause");
    return 0;
}
4.7 享元模式#
1) 享元模式(Flyweight Pattern) 也叫 蝇量模式:运用共享技术有效地支持大量细粒度的对象
2) 常用于系统底层开发,解决系统的性能问题。像数据库连接池,里面都是创建好的连接对象,在这些连接对象中有我们需要的则直接拿来用,避免重新创建,如果没有我们需要的,则创建一个
3) 享元模式能够解决重复对象的内存浪费的问题,当系统中有大量相似对象,需要缓冲池时。不需总是创建新对象,可以从缓冲池里拿。这样可以降低系统内存,同时提高效率
逻辑思路图如下:

示例代码中有个 FlyWeightFactor 的类,它内部有一个 getTeacher 方法,我们通过它创建对象,如果我们已经有这个序号对应的对象则不需要创建,直接从 map 里取出,如果没有,我们需要 new 一个新的对象。通过这种模式,我们解决了对象内存浪费问题,提高了效率。
#include <iostream>
using namespace std;
#include <map>

class Person{
public:
    Person(string name, int age){
        m_name = name;
        m_age = age;
    }

    virtual void printT(void) = 0;
protected:
    string m_name;
    int m_age;
};

class Teacher: public Person{
public:
    Teacher(string name, int age, string id): Person(name, age){
        m_id = id;
    }

    void printT(void){
        cout << "name: " << m_name << "  age: " << m_age << "  id: " << m_id << endl;
    }
private:
    string m_id;
};

class FlyWeightFactor{
public:
    FlyWeightFactor(void){
        m_map1.clear();
    }

    ~FlyWeightFactor(void){
        for(map<string,Person*>::iterator it = m_map1.begin(); it != m_map1.end(); it++){
            delete (it->second);
        }
    }

    Person *getTeacher(string id){
        map<string, Person*>::iterator it;
        it = m_map1.find(id);
        Person *tmp = NULL;
        if(it == m_map1.end()){
            string name;
            int age;
            cout << "Please input the name of teacher" << endl;
            cin >> name;
            cout << "Please input the age of the teacher" << endl;
            cin >> age;
            tmp = new Teacher(name, age, id);
            m_map1.insert(pair<string, Person*>(id, tmp));
        }
        else{
            tmp = it->second;
        }
        return tmp;
    }
private:
    map<string, Person*> m_map1;
};

void test01(void){
    FlyWeightFactor *fwf = NULL;
    Person *p1 = NULL;
    Person *p2 = NULL;
    Person *p3 = NULL;

    fwf = new FlyWeightFactor;
    p1 = fwf->getTeacher("10");
    p1->printT();
    p2 = fwf->getTeacher("9");
    p2->printT();
    p3 = fwf->getTeacher("9");
    p2->printT();
}

int main(void){
    test01();
    system("pause");
    return 0;
}
5 行为型模式#
5.1 模板模式#
模板方法把具有特定步骤算法中的某些必要的处理委让给抽象方法。通过子类继承对抽象方法的不同实现改变整个算法的行为。
总结:
在抽象类中统一操作步骤,并规定好接口;让子类实现接口。这样可以 把各个具体子类和操作步骤接耦合。
逻辑思路图如下:

示例代码里,我们在 Base 这个基类里有一个 run 方法,这里规定了方法的具体运行流程。我们继承 Base,得到 Son 这个类在 Son 里对其中的方法进行重写,达到多态的效果。代码如下:
//本程序实现的是模板方法
#include <iostream>
using namespace std;

class Base{
public:
    void run(void){
        step1();
        if(step2()){
            step3();
        }
        for(int i=0; i<4; i++){
            step4();
        }
        step5();
    }
    virtual ~Base(void){ };
protected:
    void step1(void){
        cout << "step1 call" << endl;
    }

    void step3(void){
        cout << "step3 call" << endl;
    }

    void step5(void){
        cout << "step5 call" << endl;
    }

    virtual bool step2(void) = 0;
    virtual void step4(void) = 0;
    int *p;
};

class Son:public Base{
protected:
    virtual bool step2(void){
        return 1;
    }

    virtual void step4(void){
        cout << "step4 call" << endl;
    }
};

int main(void){
    Base *p = new Son();
    p->run();
    delete p;
    system("pause");
    return 0;
}
5.2 命令模式#
命令模式是一个高内聚的模式,其定义为:将一个请求封装成一个对象,从而让你使用不同的请求把客户端参数化,对请 求排队或者记录请求日志,可以提供命令的撤销和恢复功能。
逻辑思路图如下:

#include <iostream>
using namespace std;
#include <string>
#include <list>

class Doctor{
public:
    void treat_eyes(void){
        cout << "treat eyes" << endl;
    }

    void treat_nose(void){
        cout << "treat nose" << endl;
    }
};

class Command{
public:
    virtual void treat(void) = 0;
};

class CommandTreatEyes: public Command{
public:
    CommandTreatEyes(Doctor *doctor){
        m_doctor = doctor;
    }

    virtual void treat(void){
        m_doctor->treat_eyes();
    }
private:
    Doctor *m_doctor;
};

class CommandTreatNose: public Command{
public:
    CommandTreatNose(Doctor *doctor){
        m_doctor = doctor;
    }

    void treat(void){
        m_doctor->treat_nose();
    }
private:
    Doctor *m_doctor;
};

class Nurse{
public:
    Nurse(Command *command){
        m_command = command;
    }

    void submittedCase(void){
        m_command->treat();
    }
private:
    Command *m_command;
};

class HeadNurse{
public:
    HeadNurse(){
        m_list.clear();
    }

    void setCommand(Command *command){
        m_list.push_back(command);
    }

    void SubmittedCommand(void){
        for(list<Command*>::iterator it = m_list.begin(); it!=m_list.end(); it++){
            (*it)->treat();
        }
    }
private:
    list<Command*> m_list;
};

void test01(void){
    Doctor *doctor = NULL;
    Command *command = NULL;
    Nurse *nurse = NULL;

    doctor = new Doctor;
    command = new CommandTreatEyes(doctor);
    nurse = new Nurse(command);

    nurse->submittedCase();
}

void test02(void){
    Doctor *doctor = NULL;
    Command *command1 = NULL;
    Command *command2 = NULL;
    Command *command3 = NULL;
    HeadNurse *hnurse = NULL;

    doctor = new Doctor;
    command1 = new CommandTreatEyes(doctor);
    command2 = new CommandTreatNose(doctor);
    command3 = new CommandTreatEyes(doctor);
    hnurse = new HeadNurse;

    hnurse->setCommand(command1);
    hnurse->setCommand(command2);
    hnurse->setCommand(command3);

    hnurse->SubmittedCommand();
}

int main(void){
    // test01();
    test02();
    system("pause");
    return 0;
}
5.3 责任链模式#
为了避免请求发送者与多个请求处理者耦合在一起,将所有请求的处理者通过前一对象记住其下一个对象的引用而连成一条链;当有请求发生时,可将请求沿着这条链传递,直到有对象处理它为止。
逻辑思路图如下:

示例代码里,我们抽象了一个类 CarHandle,三个类继承了 CarHandle 并对其方法 handleCar 和 setNextHandle 进行了继承重写。重要的是通过 setNextHandle 函数赋值给其保护属性 m_carhandle,并在 handleCar 里自动调用其 handleCar 方法。这个方法下我们可以设置责任链的传播次序,使用头部的 handleCar 便可以链式地访问所有 handleCar 函数。代码如下:
#include <iostream>
using namespace std;

class CarHandle{
public:
    virtual void handleCar(void) = 0;
    virtual void setNextHandle(CarHandle *carhandle) = 0;
protected:
    CarHandle *m_carhandle;
};

class HeadCarHandle: public CarHandle{
public:
    virtual void handleCar(void){
        cout << "Handle the head of the car" << endl;
        if(m_carhandle != NULL){
            m_carhandle->handleCar();
        }
    }

    virtual void setNextHandle(CarHandle *carhandle){
        m_carhandle = carhandle;
    }
};

class BodyCarHandle: public CarHandle{
public:
    virtual void handleCar(void){
        cout << "Handle the body of the car" << endl;
        if(m_carhandle != NULL){
            m_carhandle->handleCar();
        }
    }

    virtual void setNextHandle(CarHandle *carhandle){
        m_carhandle = carhandle;
    }
};

class TailCarHandle: public CarHandle{
public:
    virtual void handleCar(void){
        cout << "Handle the tail of the car" << endl;
        if(m_carhandle != NULL){
            m_carhandle->handleCar();
        }
    }

    virtual void setNextHandle(CarHandle *carhandle){
        m_carhandle = carhandle;
    }
};

void test01(void){
    CarHandle *head = new HeadCarHandle;
    CarHandle *body = new BodyCarHandle;
    CarHandle *tail = new TailCarHandle;

    head->setNextHandle(body);
    body->setNextHandle(tail);
    tail->setNextHandle(NULL);
    head->handleCar();
    delete head;
    delete body;
    delete tail;
}

int main(void){
    test01();
    system("pause");
    return 0;
}
5.4 策略模式#
策略模式是一种简单却常用的设计模式,它的应用场景非常广泛。该模式定义了一系列算法,并将每个算法封装起来,使它们可以相互替换,且算法的变化不会影响使用算法的客户。策略模式属于对象行为模式,它通过对算法进行封装,把使用算法的责任和算法的实现分割开来,并委派给不同的对象对这些算法进行管理。
该模式主要解决在有多种算法相似的情况下,使用 if...else 所带来的复杂和难以维护。它的优点是算法可以自由切换,同时可以避免多重if...else判断,且具有良好的扩展性。
代码逻辑图如下:

示例代码里抽象了一个 TaxSterategy 接口,SalesOrder 地实现依赖于它,下面若干类继承 TaxSterategy 并对其方法进行重写。SalesOrder 采用 TaxSterategy 的子类初始化对象,通过对象的多态性实现不同的效果。如果想扩展程序,只需要继承重写基类就行了,相对于用传统的分支 if...else...,在代码的维护上有优势,并且符合开放封闭原则。代码如下:
//此处实验的是策略方法
//策略方法对比于传统的多分支实现法,具有可扩展,易维护的特性
#include <iostream>
using namespace std;

//抽象Tax类型
class TaxSterategy{
public:
    virtual double calculate() = 0;
    virtual ~TaxSterategy(){ };
};

//具体分类(CN_Tax类),对抽象Tax继承
class CN_Tax:public TaxSterategy{
public:
    virtual double calculate(){
        cout << "CN_Tax" << endl;
        return 1;
    }
};

//具体分类(US_Tax类),对抽象Tax继承
class US_Tax:public TaxSterategy{
public:
    virtual double calculate(){
        cout << "US_Tax" << endl;
        return 2;
    }
};

//具体分类(DE_Tax类),对抽象Tax继承
class DE_Tax:public TaxSterategy{
public:
    virtual double calculate(){
        cout << "DE_Tax" << endl;
        return 3;
    }
};

//具体分类(FR_Tax类),对抽象Tax继承
class FR_Tax:public TaxSterategy{
public:
    virtual double calculate(){
        cout << "FR_Tax" << endl;
        return 4;
    }
};

//定义操作他们的类
class SalesOrder{
private:
    TaxSterategy *tax;
public:
    //有参构造函数
    SalesOrder(TaxSterategy *country){
        this->tax = country;
    }
    //析构函数,删除tax指针
    ~SalesOrder(){
        delete tax;
    }
    double CalculateTax(){
        return this->tax->calculate();
    }
};

//测试程序
void test01(void){
    FR_Tax *fr = new FR_Tax();
    SalesOrder order(fr);
    cout << order.CalculateTax() << endl;
}

//主函数
int main(void){
    test01();
    system("pause");
    return 0;
}
5.5 中介者模式#
中介者模式 (Mediator Pattern) 定义:用一个中介对象来封装一系列的对象交互,中介者使各对象不需要显式地相互引用,从而使其耦合松散,而且可以独立地改变它们之间的交互。中介者模式又称为调停者模式,它是一种对象行为型模式。
逻辑思路图如下:

示例代码里,我们通过一个中介者 Mediator 抽象,将其指针传入各类,这是我们不再通过自身连接不同 Person 对象,而是通过 Mediator 的子类对象对两个 Person 对象作用。通过不同的 Mediator 子类对象,我们可以对连接对象进行不同操作,示例代码里举例了找对象的逻辑。代码如下:
#include <iostream>
using namespace std;
#include <string>

class Mediator;

class Person{
public:
    Person(string name, int sex, int condi, Mediator *m){
        m_name = name;
        m_sex = sex;
        m_condi = condi;
        m_mediator = m;
    }

    int getCondi(void){
        return m_condi;
    }

    int getSex(void){
        return m_sex;
    }

    string getName(void){
        return m_name;
    }

    virtual void getParter(Person *person) = 0;
protected:
    string m_name;
    int m_sex;
    int m_condi;
    Mediator *m_mediator;
};

class Mediator{
public:
    virtual void setMen(Person *men) = 0;
    virtual void setWomen(Person *women) = 0;
    virtual void getParter(void) = 0;
protected:
    Person *pmen;
    Person *pwomen;
};

class Mediator_a: public Mediator{
public:
    virtual void setMen(Person *men){
        pmen = men;
    }
    virtual void setWomen(Person *women){
        pwomen = women;
    }
    virtual void getParter(void){
        if(pmen->getSex() == pwomen->getSex()){
            cout << "I am not gay" << endl;
        }
        else if(pmen->getCondi() == pwomen->getCondi()){
            cout << pmen->getName() << " and " << pwomen->getName() << " are a perfect match" << endl;
        }
        else{
            cout << pmen->getName() << " and " << pwomen->getName() << " are not a match" << endl;
        }
    }
};

class Men: public Person{
public:
    Men(string name, int sex, int condi, Mediator *m): Person(name, sex, condi, m){

    }
    virtual void getParter(Person *person){
        m_mediator->setMen(this);
        m_mediator->setWomen(person);
        m_mediator->getParter();
    }
};

class Women: public Person{
public:
    Women(string name, int sex, int condi, Mediator *m): Person(name, sex, condi, m){

    }
    virtual void getParter(Person *person){
        m_mediator->setMen(person);
        m_mediator->setWomen(this);
        m_mediator->getParter();
    }
};

// //直接找对象
// void test01(void){
//     Person *p1 = new Women("lucy", 0, 2);
//     Person *p2 = new Men("jack", 1, 4);
//     Person *p3 = new Men("Mark", 1, 2);
//     p1->getParter(p2);
//     p1->getParter(p3);
// }

//通过中介找对象
void test02(void){
    Mediator *m = new Mediator_a;
    Person *p1 = new Women("lucy", 0, 2, m);
    Person *p2 = new Men("jack", 1, 4, m);
    Person *p3 = new Men("Mark", 1, 2, m);
    p1->getParter(p2);
    p1->getParter(p3);
    p2->getParter(p3);
}

int main(void){
    // test01();
    test02();
    system("pause");
    return 0;
}
5.6 观察者模式#
观察者模式,属于行为型模式的一种,它定义了一种一对多的依赖关系,让多个观察者对象同时监听某一个主题对象。这个主题对象在状态变化时,会通知所有的观察者对象,使他们能够自动更新自己。
逻辑思路图如下:

示例代码里通过 Boss 里的一个 list 收集 hero 对象,hero 作为观察对象,当 boss 里删除 hero 时,通过 boss 里的 notify 函数从迭代器里取出 hero 对象,并对其进行告知。此处只展示模型,通过修改可实现告知哪个 hero 被删除。代码如下:
//此处实验的是观察者模式
#include <iostream>
#include <windows.h>
#include <string>
#include <list>
using namespace std;

//抽象英雄类
class AbstractHero{
public:
    virtual void update(void) = 0;
};

//继承抽象英雄类,定义Hero1
class Hero1: public AbstractHero{
public:
    Hero1(){
       cout << "Hero1 is call" << endl;
    }
    virtual void update(void){
        cout << "Hero1 is stop" << endl;
    }
};

//继承AbstractHero,定义Hero2
class Hero2: public AbstractHero{
public:
    Hero2(){
        cout << "Hero2 is call" << endl;
    }
    virtual void update(){
        cout << "Hero2 is stop" << endl;
    }
};

//继承抽象英雄类,定义Hero3
class Hero3: public AbstractHero{
public:
    Hero3(){
        cout << "Hero3 is call" << endl;
    }
    virtual void update(){
        cout << "Hero3 is stop" << endl;
    }
};

//抽象Boss类
class AbstractBoss{
public:
    //添加观察者
    virtual void addHero(AbstractHero *hero) = 0;
    //删除观察者
    virtual void deleteHero(AbstractHero *hero) = 0;
    //通知函数
    virtual void notify(void) = 0;
};

//继承AbstractBoss,定义Boss1
class Boss1: public AbstractBoss{
public:
    Boss1(void){
        this->list_hero.clear();
    }
    virtual void addHero(AbstractHero *hero){
        list_hero.push_back(hero);
    }
    virtual void deleteHero(AbstractHero *hero){
        list_hero.remove(hero);
    }
    virtual void notify(void){
        for(list<AbstractHero*>::iterator it = list_hero.begin(); it!=list_hero.end(); it++){
            (*it)->update();
        }
    }
private:
    list<AbstractHero*> list_hero;
};

void test01(void){
    AbstractHero *hero1 = new Hero1;
    AbstractHero *hero2 = new Hero2;
    AbstractHero *hero3 = new Hero3;

    AbstractBoss *bos = new Boss1;

    bos->addHero(hero1);
    bos->addHero(hero2);
    bos->addHero(hero3);

    cout << "1**********" << endl;
    bos->notify();
    bos->deleteHero(hero3);
    cout << "2**********" << endl;
    bos->notify();

    delete hero1;
    delete hero2;
    deete hero3;
    delete bos;
}

int main(void){
    test01();
    system("pause");
    return 0;
}
5.7 备忘录模式#
备忘录模式,是行为模式之一・。它的作用是保护对象的内部状态,并在需要的时候恢复对象以前的状态。
逻辑思路图如下:

对象 Person 通过持有一个 MemoTo 的指针,对其数据进行拷贝操作,有需要时进行恢复。CareTaker 类也可以对 Person 数据进行拷贝,好处是,通过它可以不持有 Person 指针进行恢复工作。代码如下:
#include <iostream>
using namespace std;
#include <string>

class MemoTo{
public:
    MemoTo(string name, int age){
        m_name = name;
        m_age = age;
    }

    void setName(string name){
        m_name = name;
    }

    void setAge(int age){
        m_age = age;
    }

    string getName(void){
        return m_name;
    }

    int getAge(void){
        return m_age;
    }
private:
    string m_name;
    int m_age;
};

class Person{
public:
    Person(string name, int age){
        m_name = name;
        m_age = age;
    }

    void setName(string name){
        m_name = name;
    }

    void setAge(int age){
        m_age = age;
    }

    string getName(void){
        return m_name;
    }

    int getAge(void){
        return m_age;
    }

    MemoTo *creatMeno(void){
        m_meno = new MemoTo(m_name, m_age);
        return m_meno;
    }

    void recover(void){
        m_name = m_meno->getName();
        m_age = m_meno->getAge();
    }

    void recover(MemoTo *memo){
        m_name = memo->getName();
        m_age = memo->getAge();
    }

    void printD(void){
        cout << "name: " << m_name << "  age: " << m_age << endl;
    }
private:
    string m_name;
    int m_age;
    MemoTo *m_meno;
};

class CareTaker{
public:
    CareTaker(MemoTo *memo){
        m_memo = memo;
    }

    void setMemo(MemoTo *memo){
        m_memo = memo;
    }

    MemoTo *recover(void){
        return m_memo;
    }
private:
    MemoTo *m_memo;
};

// void test01(void){
//     Person *p1 = new Person("Tom", 18);
//     p1->creatMeno();
//     p1->setName("Jack");
//     p1->setAge(21);
//     p1->printD();
//     p1->recover();
//     p1->printD();
//     delete p1;
// }

void test02(void){
    Person *p1 = new Person("Tom", 18);
    CareTaker *ca = new CareTaker(p1->creatMeno());
    cout << "before: " << endl;
    p1->printD();
    p1->setName("Mark");
    p1->setAge(27);
    cout << "after: " << endl;
    p1->printD();
    p1->recover(ca->recover());
    cout << "revover: "<< endl;
    p1->printD();
}

int main(void){
    // test01();
    test02();
    system("pause");
    return 0;
}
5.8 访问者模式#
访问者(Visitor)模式的定义:将作用于某种数据结构中的各元素的操作分离出来封装成独立的类,使其在不改变数据结构的前提下可以添加作用于这些元素的新的操作,为数据结构中的每个元素提供多种访问方式。它将对数据的操作与数据结构进行分离,是行为类模式中最复杂的一种模式。
逻辑思路图如下:

示例代码里把数据结构 ParkElement 和数据操作 Visitor 分离出来,只需要 ParkElement 去接受 Visitor 子类对象对他的访问就可以。代码如下:
#include <iostream>
using namespace std;
#include <list>

class ParkElement;

class Visitor{
public:
    virtual void visit(ParkElement *pm) = 0;
};

class ParkElement{
public:
    virtual void accept(Visitor *visitor) = 0;
};

class ParkA: public ParkElement{
public:
    virtual void accept(Visitor *visitor){
        visitor->visit(this);
    }
};

class ParkB: public ParkElement{
public:
    virtual void accept(Visitor *visitor){
        visitor->visit(this);
    }
};

class Park: public ParkElement{
public:
    Park(void){
        m_list.clear();
    }

    void setParkElement(ParkElement *pe){
        m_list.push_back(pe);
    }

    virtual void accept(Visitor *v){
        for(list<ParkElement*>::iterator it = m_list.begin(); it!=m_list.end(); it++){
            (*it)->accept(v);
        }
    }
private:
    list<ParkElement*> m_list;
};

class VisitorA: public Visitor{
public:
    virtual void visit(ParkElement *pm){
        cout << "VisitorA is call" << endl;
    }
};

class VisitorB: public Visitor{
public:
    virtual void visit(ParkElement *pm){
        cout << "VisitorB is call" << endl;
    }
};

class Manager: public Visitor{
public:
    virtual void visit(ParkElement *pm){
        cout << "Manager visit" << endl;
    }
};

// void test01(void){
//     Visitor *v1 = new VisitorA;
//     Visitor *v2 = new VisitorB;

//     ParkElement *pm1 = new ParkA;
//     ParkElement *pm2 = new ParkB;

//     pm1->accept(v1);
//     pm2->accept(v2);

//     delete v1;
//     delete v2;
//     delete pm1;
//     delete pm2;
// }

void test02(void){
    Visitor *manager = new Manager;
    ParkElement *p1 = new ParkA;
    ParkElement *p2 = new ParkB;
    ParkElement *p3 = new ParkA;
    Park *parkAll = new Park;
    parkAll->setParkElement(p1);
    parkAll->setParkElement(p2);
    parkAll->setParkElement(p3);
    parkAll->accept(manager);
}

int main(void){
    // test01();
    test02();
    system("pause");
    return 0;
}
5.9 状态模式#
状态模式,又称状态对象模式(Pattern of Objects for States),状态模式是对象的行为模式。状态模式允许一个对象在其内部状态改变的时候,改变其行为。这个对象看上去就像改变了它的类一样。
逻辑思路图如下:

示例代码里有三种状态,为 state1 和 state2 以及未知(设为默认的 state, 但是不执行)。代码里通过对 m_hour 的修改,控制其内部状态的改变。代码如下:
#include <iostream>
using namespace std;

class Worker;

class State{
public:
    virtual void doSomething(Worker *worker) = 0;
};

class Worker{
public:
    void setHour(int hour){
        m_hour = hour;
    }

    void setState(State *state){
        m_curstate = state;
    }

    int getHour(void){
        return m_hour;
    }

    State *getCurState(void){
        return m_curstate;
    }

    void doSomething(void){
        m_curstate->doSomething(this);
    }
private:
    int m_hour;
    State *m_curstate;
};

class State1: public State{
public:
    virtual void doSomething(Worker *w);
};

class State2: public State{
public:
    virtual void doSomething(Worker *w);
};

void State1::doSomething(Worker *w){
    if(w->getHour() == 7 || w->getHour() == 8){
        cout << "Have breakfast" << endl;
    }
    else{
        delete w->getCurState();
        w->setState(new State2);
        w->getCurState()->doSomething(w);
    }
}

void State2::doSomething(Worker *w){
    if(w->getHour() == 11 || w->getHour() == 12){
        cout << "Eat lunch" << endl;
    }
    else if(w->getHour() == 7 || w->getHour() == 8){
        delete w->getCurState();
        w->setState(new State1);
        w->doSomething();
    }
    else{
        delete w->getCurState();
        w->setState(new State1);
        cout << "Current time: " << w->getHour() << " Unknown" << endl;
    }
}

void test01(void){
    Worker *w1 = new Worker;
    State *s1 = new State1;
    w1->setHour(12);
    w1->setState(s1);
    w1->doSomething();
    w1->setHour(11);
    w1->doSomething();
    w1->setHour(7);
    w1->doSomething();
    delete w1;
    delete s1;
}

int main(void){
    test01();
    system("pause");
    return 0;
}
5.10 解释器模式#
解释器模式属于行为型模式。它的定义为:给定一个语言,定义它的文法的一种表示,并定义一个解释器,这个解释器使用该表示来解释语言中的句子。
示例代码如下:

示例代码通过抽象出 PlusExpression 和 MinusExpression 对 Context 类进行解释,分别是加法解释和减法解释。代码如下:
#include <iostream>
using namespace std;

class Context{
public:
    Context(int num){
        m_num = num;
    }

    void setNum(int num){
        m_num = num;
    }

    void setRes(int res){
        m_res = res;
    }

    int getNum(void){
        return m_num;
    }

    int getRes(void){
        return m_res;
    }

    void printT(void){
        cout << "num: " << m_num << "  res: " << m_res << endl;
    }
private:
    int m_num;
    int m_res;
};

class Expression{
public:
    virtual void interpreter(Context *context) = 0;
};

class PlusExpression: public Expression{
public:
    virtual void interpreter(Context *context){
        int num = context->getNum();
        num++;
        context->setNum(num);
        context->setRes(num);
    }
};

class MinusExpression: public Expression{
public:
    virtual void interpreter(Context *context){
        int num = context->getNum();
        num--;
        context->setNum(num);
        context->setRes(num);
    }
};

void test01(void){
    Context *c1 = new Context(10);
    Expression *e1 = new PlusExpression;

    e1->interpreter(c1);
    c1->printT();
}

int main(void){
    test01();
    system("pause");
    return 0;
}
5.11 迭代器模式#
迭代器模式(Iterator),提供一种方法顺序访问一个聚合对象中的各种元素,而又不暴露该对象的内部表示。是一种使用比较广泛的设计模式。
示例图如下:

示例代码里,我们在 Aggregate 类里定义 createIterator,让他创建迭代器并把自身传入迭代器对象。迭代器获得了数据的引用,便可以通过引用访问数据。示例里是顺序访问,用 next 实现,循环迭代。代码如下:
#include <iostream>
using namespace std;

#define SIZE 5

//抽象迭代器
class Myiterator{
public:
    virtual void first(void) = 0;
    virtual void next(void) = 0;
    virtual bool IsDone(void) = 0;
    virtual int currentItem(void) = 0;
};

//抽象数据
class Aggregate{
public:
    virtual Myiterator *createIterator(void) = 0;
    virtual int getItem(int index) = 0;
    virtual int getSize(void) = 0;
protected:
    int object[SIZE];
};

//实例化类
class ContreteIterator: public Myiterator{
public:
    ContreteIterator(Aggregate *ag){
        this->ag = ag;
        first();
    }

    virtual void first(void){
        _current_index = 0;
    }

    virtual void next(void){
        if(_current_index < ag->getSize()){
            _current_index++;
        }
    }

    virtual bool IsDone(void){
        return (_current_index == ag->getSize());
    }

    virtual int currentItem(void){
        return (ag->getItem(_current_index));
    }
private:
    int _current_index;
    Aggregate *ag;
};

class ContreteAggregate: public Aggregate{
public:
    ContreteAggregate(void){
        for(int i=0; i<SIZE; i++){
            object[i] = 100+i;
        }
    }

    Myiterator *createIterator(void){
        return new ContreteIterator(this);
    }

    virtual int getItem(int index){
        return object[index];
    }

    virtual int getSize(void){
        return SIZE;
    }
};

void test01(void){
    Aggregate *ag = new ContreteAggregate;

    Myiterator *it = ag->createIterator();

    for(; !(it->IsDone()); it->next()){
        cout << it->currentItem() << endl;
    }
}

int main(void){
    test01();
    system("pause");
    return 0;
}